The 5 MRI simulator types compared – Pros, cons, features & best uses
Written by:
Erik Jacobsson
Key Takeaways
Five MRI simulator types exist, each works differently and is suited to different needs:
Clinical-grade simulators
Research engines
Formula-based simulators
Geometry-only simulators
Console simulators (image banks)
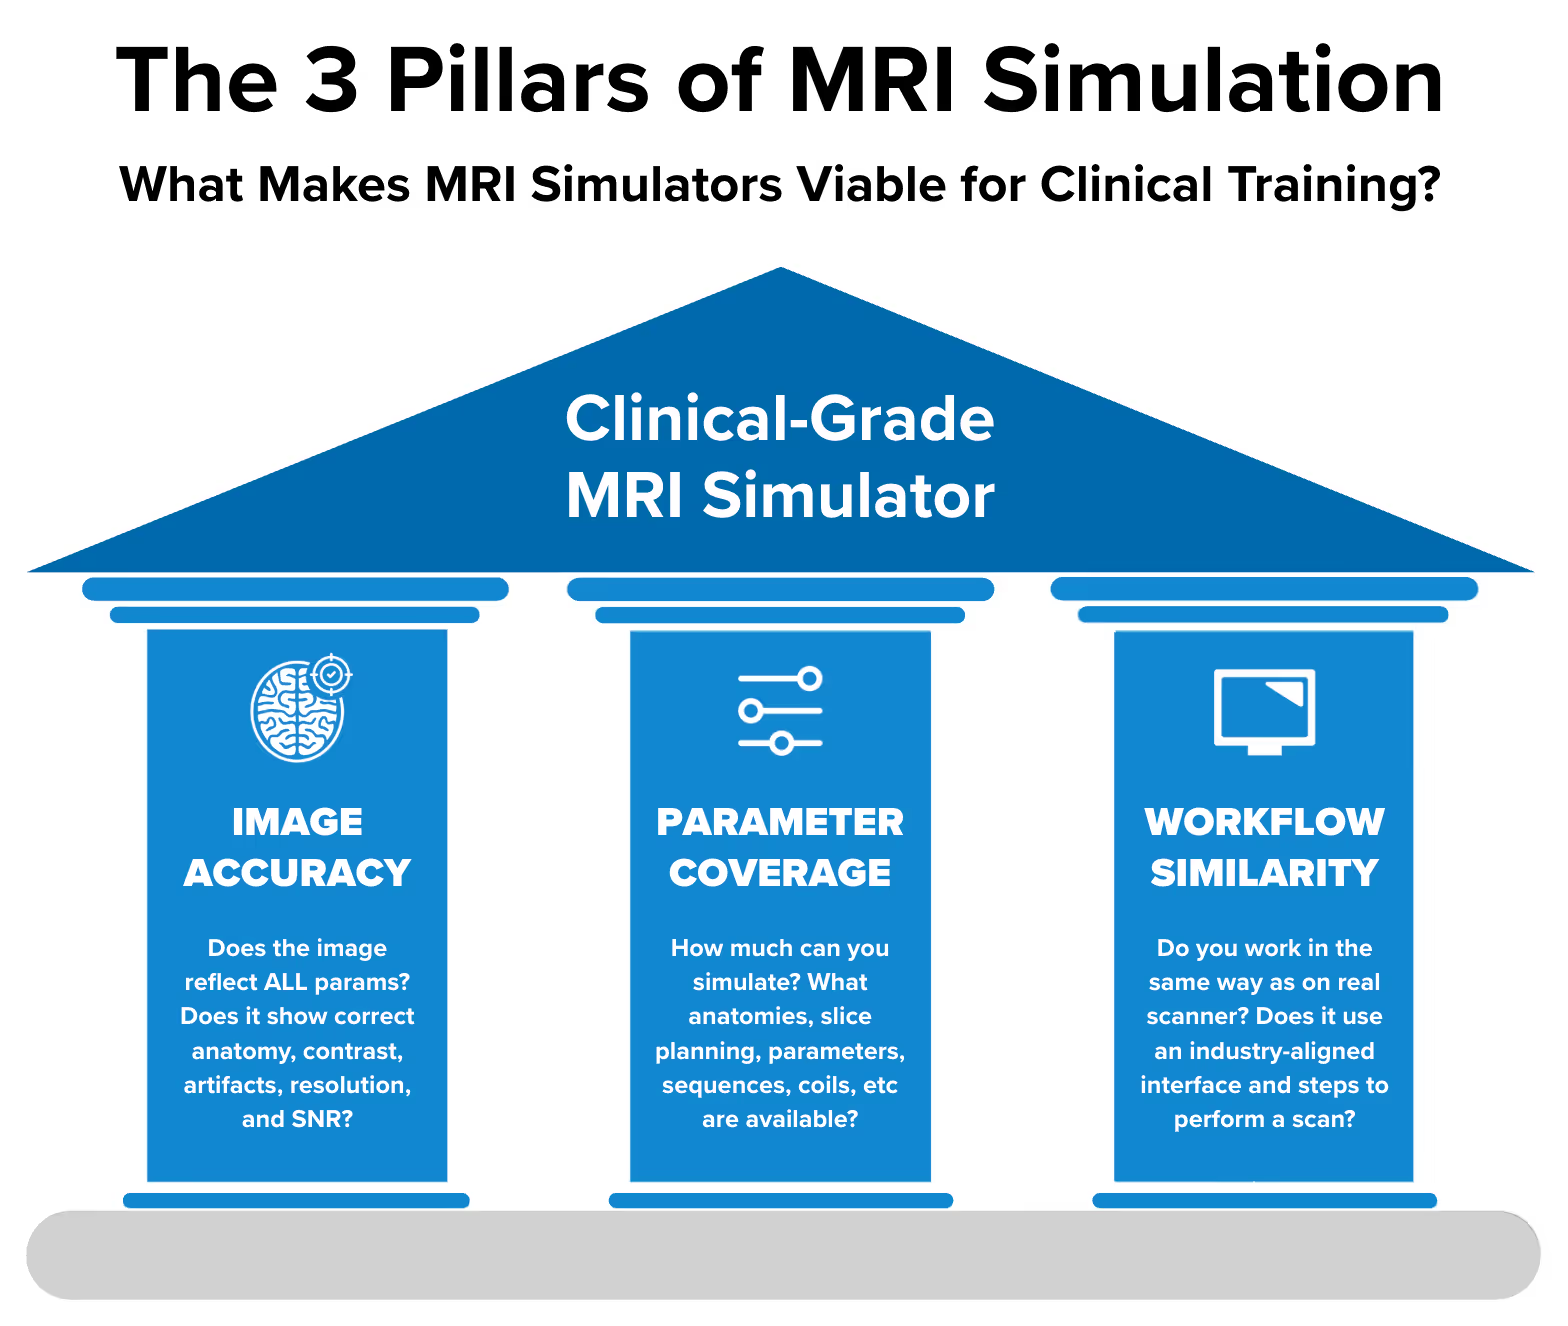
Three factors determine training value:
Image accuracy: Does the image change correctly when you adjust parameters?
Parameter coverage: How many clinical scenarios, sequences, and settings can you simulate?
Workflow similarity: Do you interact with it the same way as a real scanner?
To be viable for training MRI technologists for real clinical work, a simulator must score high on all three factors. Only clinical-grade simulators achieve this.
Corsmed is currently the only simulator that meets all three requirements for clinical-grade training.
The other four types all fall short on at least one factor, limiting their use to specific, narrow training purposes.
Leading universities and hospitals worldwide use Corsmed, including UCLH NHS, The Christie NHS, British Columbia Institute of Technology, Indiana University, and City St George's University of London.
Not all MRI simulators work the same
When you search for "MRI simulator," you'll find dozens of options.
Here's what makes evaluation hard: They're all called "MRI simulators," but they work completely differently.
Imagine two flight simulators, both with a complete cockpit and controls. One simulates real aerodynamics. The other plays pre-recorded clips. Both look identical, but only one teaches you to fly.
This guide clarifies the differences and helps you find the right fit.
It covers all 5 simulator types, how each works, what each delivers, and how to decide which one you need.
What makes a good MRI simulator? – The 3 factors
When evaluating the quality of an MRI simulator, 3 factors determine whether the simulator will make you better at real-world scanning:
Image Accuracy: Do you get the same image as a real scanner would have produced?
Parameter Coverage: How many different clinical scenarios can you simulate?
Workflow Similarity: Do you perform scans in the same way as on real scanners?
1. Image accuracy: Does the image reflect your parameters?
Image accuracy is whether the simulator shows the correct image when you change settings.
When you increase TE from 20ms to 80ms, does fluid actually brighten?
When you reduce the matrix, does resolution actually worsen?
When you position your slices wrong, do you get wrap artifacts?
The test: Do all your parameter changes show up in the image with correct effects?
2. Parameter coverage: What settings are available?
Parameter coverage measures the range of clinical scenarios available.
Accurate images require many parameters working together. Use a short TR and you get T1 weighting. Scan at 3T and T1 relaxation times lengthen. But do both, and the T1 contrast you expected is weakened, an outcome neither parameter produces alone.
The test: Can you explore the full range of sequences, parameters, anatomies, and hardware, or only a narrow slice of what clinical MRI involves?
3. Workflow similarity: Is it like operating a real scanner?
Workflow similarity measures whether you interact with the simulator like you would with clinical equipment.
Can you plan slices with your mouse?
Does the interface follow industry standards?
Can you configure scans without writing code?
The test: Do you learn the same workflow that you use on a real scanner?
Brain slice planning on an MRI simulator
“I’m educating MRI students or technologists for clinical practice. What performance do I need?”
If you're an MRI educator teaching students or technologists who will operate real scanners on real patients, you need the following performance across the three factors.
1. Image accuracy: Requirements for clinical training
When training technologists who will scan real patients, image accuracy is especially important. The simulator should produce the same image as a real scanner when you change parameters.
The image must show correct:
Slice planning: Exact angle, slice position, and anatomy displayed
Contrast: Correct contrast weightings including washout effects
Artifacts: All artifacts appear as on a real scan, including those related to patient, tissue interfaces, hardware, sampling, image reconstruction, or sequence technique
Resolution (voxel size): Accurate resolution, including slice thickness and partial volume effects
Signal-to-noise ratio (SNR): Accurate representation of SNR with correct noise distribution
Acquisition time: While simulation should be fast, accurate information about real scan duration must be provided
2. Parameter coverage: Requirements for clinical training
To be viable for clinical training, a simulator must let you adjust the following: (Click on a section to show its contents)
Body parts and pathologies
Head and neck: Brain (routine, tumor, MS), pituitary gland, orbits, IAM/IAC, carotids
Spine: Cervical, thoracic, lumbar, sacrum, and coccyx
3. Workflow similarity: Requirements for clinical training
To be viable for clinical training, a simulator must have:
Interface that follows industry standards used by real scanners
Slice planning with your mouse similar to real MRI consoles
No code required to perform scans
Type 1: Clinical-grade simulators
Clinical-grade simulators meet all three requirements for complete training.
How they work
These simulators recreate the full MRI physics process from scratch.
They use:
Digital 3D patient models with millions of sub-millimeter voxels, each with tissue properties that mimic real magnetic behavior
Bloch equations to simulate how millions of protons respond to magnetic fields and RF pulses
Massive GPU compute to process every time step of the pulse sequence
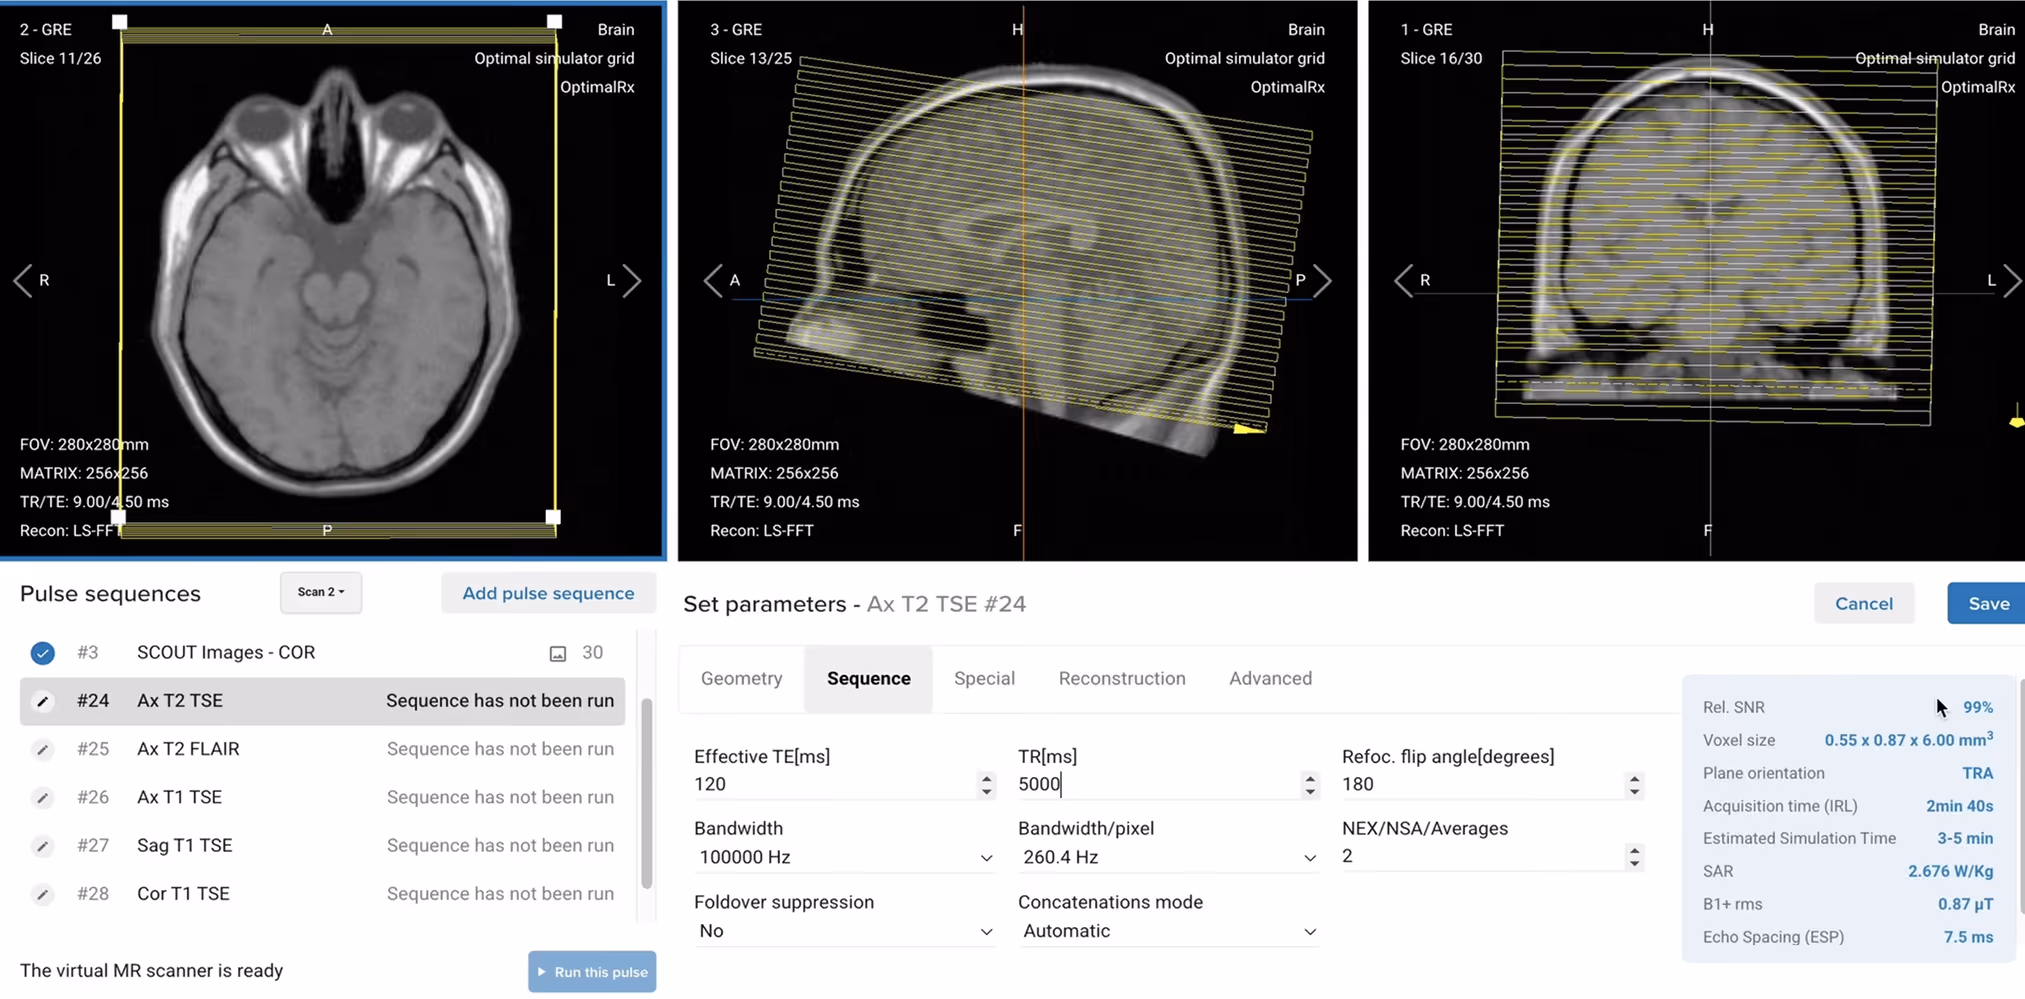
The simulator calculates MR signal evolution, acquires k-space data, and reconstructs DICOM images. Every input gets reflected: anatomy, slice planning, contrast, artifacts, SNR, resolution, and scan time.
Clinical-grade score
Image Accuracy: High
All parameter changes produce what a real scanner would create. This includes correct contrast weighting, artifact appearance, resolution changes, SNR variations, and scan time estimates.
Do you get better at real scanning when practicing on a simulator?
If the simulator is clinical-grade, the answer is: “yes”.
University College London Hospitals, an NHS trust in the UK, were able to cut their training time by nearly 50% by practicing on a clinical MRI simulator.
“
"Now, our MRI technologists gain the same level of competence in just 3-4 months."
Clinical-grade simulators improve real scanning skills because they work like real scanners: every parameter change produces the expected image.
CNI College, which teaches hundreds of MRI students annually, learned this the hard way. After having been disappointed with many poor simulators, they have now fully switched to a clinical-grade one:
“
"If you change the parameters on most MRI simulators, the image is still the same. Corsmed's simulator actually changes the image correctly when you change the parameters."
Corsmed is currently the only MRI simulator that meets all three requirements as of 2026.
Why no other clinical-grade simulators? Creating accurate MRI simulation is really hard. It requires simulating millions of proton spins, across millions of voxels, for every millisecond of scan time.
This is hard to do accurately for just one clinical case, e.g. an axial T2 FLAIR brain.
It’s extremely difficult to do it across thousands of cases, each with different anatomies, slice planning, pulse sequences, parameters, etc.
It’s nearly impossible to do this at scale for thousands of users, while ensuring a fast simulation experience.
Corsmed’s story behind this is more than 12 years long, based on research started in 2014.
Type 2: Research engines
Research engines simulate MRI physics using Bloch equations, but they're built for development work rather than clinical training.
How they work
These engines model proton behavior under magnetic fields and RF pulses. They use CPU and GPU parallelization for speed.
However, they don’t always process all the parameters needed for accurate images. Some don't handle k-space trajectories, gradient performance, coil sensitivities, or other complex factors that real scanners manage.
The main limitation is that they are very hard to use: You must often buy special GPU hardware, write code to use them, and do lots of troubleshooting without any technical support.
To run pulse sequences, you’ll write scripts in programming languages like Python, Julia, C++, or MATLAB. You may need to create custom phantoms, and often provide your own GPU hardware. Some research engines also require MATLAB licenses.
JEMRIS – Used through MATLAB interface
Clinical-grade score
Image Accuracy: Medium (Potentially High)
The images are accurate for the parameters they can handle. Studies show mean absolute differences below 0.1% compared to reference simulators like JEMRIS.
The limitation is not accuracy but scope; they simply don't process enough parameters to create realistic clinical images.
Some engines can be programmed to extend their functionality, although this requires writing custom code.
Parameter Coverage: Low (Potentially High)
Research engines typically offer limited anatomies, pulse sequences, and parameters. Most also don’t allow slice planning.
However, if extended with custom code, their parameter coverage could be good.
Workflow Similarity: Very Poor
All research engines require programming knowledge. Users must write code in languages like Julia, Python, C++, or MATLAB to run pulses.
Few industry-standard scanner interfaces exist.
Simulators in this category
JEMRIS: An MRI simulation framework written in C++. Uses XML format for experiment configuration and HDF5 for binary I/O. Can be used via MATLAB graphical interfaces.
MRiLab: A numerical MRI simulation package with GPU acceleration. Features a highly interactive graphical user interface for experiment design. Requires MATLAB.
KomaMRI: A simulation engine built for pulse sequence development, based on the Julia programming language. Proved to be faster on PCs than JEMRIS.
ODIN: A C++ framework for developing and simulating magnetic resonance sequences. Features modular tools for RF pulse design and geometry editing.
SiMAGIN MRI: A commercial simulator by imaginSYS. Displays sequence waveforms, MR signals, and k-space in real-time. Mainly used for MRI physics rather than clinical training.
Virtual MRI Scanner: A Python-based web simulator developed at Columbia University. Features a console-like interface for virtual scans and accepts Pulseq format sequences.
SIMRI Project: An academic C-based simulator from CREATIS laboratory, Lyon. Simulates chemical shift and susceptibility artifacts with a 1D pedagogical interface.
Type 3: Formula-based simulators
Formula-based simulators use simplified equations to estimate signal intensity.
How they work
These simulators apply mathematical formulas to approximate MRI signal. For example, using the MRI signal equation S = ρ × (1 - e^(-TR/T1)) × e^(-TE/T2) to estimate signal.
You adjust parameters through a visual interface. When you change TR or TE, the simulator adjusts filters to update the image.
This method has two main limitations:
Can only handle a few parameters
Most formulas can only handle a handful of pulses like Spin, Turbo Spin, and Gradient Echo, and a few basic sequence parameters like TR, TE, and flip angle.
No slice planning, acceleration factors, nor pathologies.
The few parameters handled get inaccurately reflected in the image
In the real world, parameters interact in very complex ways to produce a final image.
A simplified formula will always show a somewhat inaccurate contrast and will miss artifacts and other image effects like blurring.
Clinical-grade score
Image Accuracy: Low
Because formulas are only capable of handling a few parameters, their image accuracy is very limited from the start.
But even for the few parameters handled, like TE and TR, you never know if the contrast is accurate or if the estimated image is far off from reality.
Parameter Coverage: Low
Again, because formulas are incapable of handling the vast majority of parameters – for example, no slice planning, acceleration factors, pathologies, nor pulses like FLAIR, STIR, and CINE – their parameter coverage is very constrained.
Some formula-based simulators do feature extensive parameter sets in their interface. Unfortunately, those additional settings are just dummy parameters that don’t influence the image.
Workflow Similarity: Low/Medium
Most use visual interfaces that look and feel somewhat like real scanners.
But the workflow often doesn’t resemble that on clinical equipment.
Formula-based simulators teach rules that don’t hold on real scanners
Students may learn general contrast trends, but not how parameters actually interact on real scanners. A protocol that looks diagnostic on the formula-based simulator may produce unusable images on real equipment.
The risk is not just incomplete learning. It is incorrect learning. Students build mental models based on simplified approximations, then have to unlearn them when they reach the clinic.
Simulators in this category
Virtual MRI Scanner (Medical Professionals): Web-based platform with interactive console providing 4.00 ASRT-approved CE credits. Users manipulate TR, TE, turbo factor, and bandwidth with real-time image updates.
ScanLabMR: Web-based simulator with separate training environments. Three environments offer parameters like Field-of-View (FOV), TE, TR, and resolution, but only for brain anatomy. Slice positioning (without other parameters) is done in a separate environment for other anatomies.
MRIcontrast: iOS app providing interactive parameter exploration. Updates images in real-time as users adjust TR, TE, flip angle, and field strength. Available for $14.99.
Type: 4. Geometry-only simulators
Geometry-only simulators allow the user to do slice planning, where they can handle their slice positions and see new slices of anatomy.
These simulators do not allow you to manipulate any parameters that affect the image beyond the slice coverage and angle.
How they work
Geometry-only are not really simulators, per se, but rather a common feature of DICOM viewers, namely MPR (Multi-Planar Reconstruction).
MPR uses isotropic acquisitions, meaning pre-acquired MRI data, to generate new slice angles.
The key point is that:
You're limited to the datasets the simulator offers
You can only reslice that existing data – image contrast and tissue appearance remain exactly the same.
Clinical-grade score
Image Accuracy: Very Low
Geometry-only simulators are not capable of handling different pulse sequences or sequence parameters.
So if you adjust TE or TR, the image shows the same contrast.
Parameter Coverage: Very Low
Again, this simulator can only handle slice planning and a few geometric parameters.
You can’t adjust pulses or any sequence parameters, which means the contrast stays the same whether you want T1 or T2 weighting.
Workflow Similarity: Low/Medium
Since you can’t do so much stuff, the workflow won’t align with that on a real scanner.
But at least, in most cases, a real MRI console is used as the interface.
When geometry-only tools are useful
These tools help with:
Teaching cross-sectional anatomy
Practicing slice angulation for standard planes
Understanding spatial relationships
They can help when learning slice planning. However, they don't teach parameter selection, protocol optimization, or the cause-and-effect relationships between settings and image appearance.
They also never show artifacts. A student can adjust the settings all they want and never once encounter wrap-around, chemical shift, or susceptibility banding. On a real scanner, those artifacts are part of every shift.
Current options in this category
Most modern DICOM Viewers: Most modern DICOM viewers give you the same functionality as a geometry-only simulator, and of course, all the other features that a DICOM viewer has.
ScanLabMR: Web-based simulator with separate training environments. One environment focuses on slice positioning and coverage, but with no simultaneous practice with pulse sequences or parameters to see the combined effect.
Type 5: Console simulators (image banks)
Console simulators replicate the scanner interface, but return pre-stored images that don't reflect your parameter choices.
How they work
These work as digital mock scanners.
The interface often looks identical to real GE, Siemens, or Philips scanners. You can click through menus, select parameters, and initiate scans.
When you scan, you get a pre-stored image from a database. No actual simulation occurs. The image doesn't reflect your parameter choices.
Clinical-grade score
Image Accuracy: N/A
Console simulators have no inner workings, so they are unable to handle any parameters. In 99% of cases, you get the same image for different settings since only a few pre-stored images are available.
This makes it impossible to learn cause-and-effect relationships between parameters and images.
Parameter Coverage: N/A
Since you are working with a replica of the actual console, all the buttons are there. But they don’t do anything.
Workflow Similarity: High
Most present images through interfaces that resemble clinical viewers.
You can browse and search similarly to how you'd navigate a PACS system.
When console simulators are appropriate
Console simulators help with:
Learning scanner interface layout before equipment arrives
Practicing menu navigation
Familiarizing staff with new vendor systems
They're designed for interface training rather than teaching MRI physics or parameter effects.
Current options in this category
Siemens SmartSimulator: Cloud-based solution simulating Siemens scanner interfaces for MRI, CT, PET, and SPECT. Allows remote practice of system features. Used by institutions for pre-training before scanner installation.
IACI MRI Simulator: A commercial console simulation software mirroring GE and Siemens scanner interfaces. Allows practice of coil selection, protocol setup, and sequence selection using pre-stored images. This tool is also distributed by Psychology Software Tools under the name MRI Console Simulation Software.
Signa Tutor: A historical MRI training system developed in 1991 for GE Signa scanners. Used Oracle database to maintain images and scan parameters. No longer maintained.
Other manufacturer simulators: Internally, each vendor has some form of console simulator, but they are mainly used for product demonstrations or installation training.
CLMRI: A Chinese web-based platform developed by Professor Peng Wenxian using DICOM format. Combines anatomy navigation with basic scanning practice.
Comparison table: All simulator types
Clinical-Grade Simulators
Research Engines
Formula-Based Simulators
Geometry-Only Simulators (MPR)
Console Simulators (Image Banks)
How It Works
Simulates full MRI physics on voxel-based 3D patients with Bloch equations and massive GPU compute; outputs k-space and reconstructs DICOM images.
Simulates proton spins with Bloch equations; usually code-driven (Julia/Python/C++/MATLAB) with limited modeled scope.
Uses simplified signal equations to estimate intensity; updates images with filters when a few parameters change.
Reslices pre-acquired isotropic MRI datasets; creates new slice angles only, not new contrast.
Replicates scanner UI; returns pre-stored images that ignore parameter changes; no actual simulation.
Image Accuracy
High – reflects anatomy, slice planning, contrast, resolution, SNR, artifacts, and scan time.
Medium/High (within scope) – accurate for modeled parameters but narrow breadth.
Low – approximate contrast; misses most artifacts and complex interactions.
Very Low – only new slice angles can be generated; contrast never changes with sequence parameters.
N/A – static, pre-stored images; parameters have no effect.
Parameter Coverage
High – anatomy, hardware, slice planning, 25+ sequences, 30+ parameters.
Low (expandable with code) – few anatomies, sequences, parameters; often no slice planning.
Low – a handful of parameters; many UI controls are dummy.
Very Low – geometry only (position and angle).
N/A – many buttons, but no real effects.
Workflow Similarity
High – scanner-like console; mouse slice planning; no coding.
Very Low – requires coding; not console-like.
Low/Medium – looks somewhat like a console but workflow differs.
Low/Medium – like DICOM viewers with basic slice planning.
High – resembles vendor consoles, but images don’t reflect inputs.
If no to either → You have a research engine or other specialized tool
If yes to both → You have a Clinical-Grade MRI Simulator
What MRI simulator is right for me?
What MRI simulator is right for you depends on what training needs you have.
For complete MRI technologist training
Recommended: Clinical-Grade Simulator
Students must learn the full workflow: parameter selection, protocol optimization, artifact troubleshooting, and the cause-and-effect relationships that define MRI expertise.
Clinical-grade simulators provide this complete training experience.
For pulse sequence development
Recommended: Research Engines
If you're developing new sequences or need to test timing before scanner implementation, research engines provide the necessary control and flexibility.
They're designed for research rather than training clinical technologists.
For anatomy and slice planning only
Could use: Geometry-Only Tools
If your goal is teaching cross-sectional anatomy and standard slice prescriptions specifically, geometry-only tools can serve this purpose.
Students won't learn parameter effects or protocol optimization with these tools.
For basic concept introduction
Could use: Formula-Based Simulators
Formula-based simulators can illustrate simple contrast trends, such as how longer TE brightens fluid. For that narrow purpose, they may work.
The tradeoff is significant, though. Students won't encounter realistic artifacts, won't learn how parameters interact, and may build mental models that need to be corrected later. For most training programs, that risk outweighs the benefit. Physics-based simulators cover the same basics while also preparing students for what real scanners actually produce.
For interface familiarization
Could use: Console Simulators
If you need users to learn button locations and menu navigation before new equipment arrives, console simulators serve this specific purpose.
They provide interface training but not understanding of MRI physics or parameter selection.
Why most programs choose clinical-grade simulation
The MRI technologist shortage is significant: 26,200 new technologists needed in the U.S. by 2032, but only 2,000 pass certification annually.
Programs face pressure to:
Train more students effectively
Improve first-time pass rates
Reduce dependence on limited scanner access
Prepare graduates for independent clinical work
Clinical-grade simulators address all these needs by providing comprehensive training that closely matches real scanner experience.
“
"Using Corsmed's simulator, our students complete 500 scan cases across a wide range of anatomies and pathologies.
ARMRIT allows students to count two simulation cases as one hour of externship, up to 250 hours."
"Corsmed's simulator is an excellent assessment tool because students build protocols and sequences from scratch. It shows exactly what parameters they've entered and how they've prescribed planes."
"With our previous simulator, the images were never correct. When students angled wrongly, no wrap artifacts. When they increased the slice thickness, no partial volume.
With Corsmed, you get every image effect and artifact exactly as you would on a real scanner.”
Leading institutions use clinical-grade simulation for:
Structured course development with hands-on exercises
Objective competency assessment
Meeting certification requirements
Bridging theory and clinical practice
Other simulator types serve specific purposes but are designed for different training goals.
Summary
Five distinct types of MRI simulators exist, each with different capabilities:
Clinical-Grade Simulators provide complete training with accurate images, comprehensive parameters, and industry-standard workflow. Corsmed is currently the only option meeting all three requirements.
Research Engines accurately simulate physics within their scope but require programming and have limited breadth. Best for pulse sequence development and research applications.
Formula-Based Simulators estimate signal intensity with simplified equations. They show only general relationships, but miss most sequence/parameter interactions and artifacts that occur on real scanners.
Geometry-Only Simulators support slice planning and anatomy exploration but can't demonstrate parameter effects or contrast changes.
Console Simulators replicate vendor interfaces but return pre-stored images that don't reflect parameter choices. Designed for interface training.
The key evaluation principle: Image Accuracy × Parameter Coverage × Workflow Similarity = Training Value
For clinical training of MRI technologists, clinical-grade simulators deliver the most comprehensive preparation.
Other types serve specific training purposes and can be valuable additions depending on your program's goals.
Want to improve your MRI training with clinical-grade simulation?